
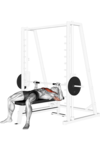
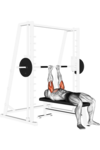
How to perform Bodyweight Hip Thrust with proper form
Starting Position
- Sit on the ground with your upper back against a bench or a sturdy surface.
- Roll a barbell or place a weight plate over your hips for added resistance (if using weights).
- Bend your knees and place your feet flat on the floor, hip-width apart.
Movement
- Engage Core: Tighten your abdominal muscles to stabilize your spine.
- Lift Hips: Drive through your heels and thrust your hips upward. Your body should form a straight line from your shoulders to your knees.
- Squeeze Glutes: At the top of the movement, squeeze your glutes tightly and hold for a moment.
Lowering
- Slowly lower your hips back down to the starting position while keeping control of the movement.
Key Points
- Keep your chin tucked and eyes looking forward.
- Focus on using your glutes, not your lower back.
- Ensure your feet remain flat, and knees stay aligned with your toes.
- Avoid arching your back excessively at the top of the lift.
Common Mistakes
- Overextending the back instead of using the glutes.
- Not placing feet close enough to the body.
- Allowing knees to cave inwards.
By following this guide, you can perform the bodyweight hip thrust safely and effectively to strengthen your glutes and improve overall hip movement.
Exercises
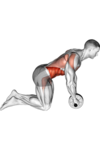
Ab Wheel, Bodyweight
Type: Core
Target: Abs
Synergist: Hamstrings, Quadriceps, Shoulders, Back, Chest

Arnold Press, Dumbbell
Type: Upper, Push
Target: Shoulders
Synergist: Chest, Triceps
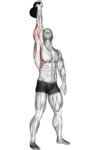
Arnold Press, Kettlebell
Type: Upper, Push
Target: Shoulders
Synergist: Chest, Triceps
Around The World, Dumbbell
Type: Core
Target: Shoulders, Chest
Synergist: Back

Back Extension, Bodyweight
Type: Lower, Core
Target: Back
Synergist: Glutes, Hamstrings
Back Extension, Leverage Machine
Type: Lower, Core
Target: Back
Synergist: Glutes, Hamstrings
Ball Slams, Medicine Ball
Type: Core, Upper
Target: Shoulders, Back
Synergist: Chest, Abs

Battle Ropes, Bodyweight
Type: Upper, Core
Target: Shoulders
Synergist: Biceps, Forearms, Back

Behind The Neck Press, Barbell
Type: Upper, Push
Target: Shoulders
Synergist: Triceps
Behind The Neck Press, Smith Machine
Type: Upper, Push
Target: Shoulders
Synergist: Triceps
Behind The Neck Press, Band
Type: Upper, Push
Target: Shoulders
Synergist: Triceps
Bench Dip, Bodyweight
Type: Upper, Push
Target: Triceps
Synergist: Shoulders, Back, Chest

Bench Press, Barbell
Type: Upper, Push
Target: Chest
Synergist: Shoulders, Triceps
Bench Press, Cable
Type: Upper, Push
Target: Chest
Synergist: Shoulders, Triceps

Bench Press, Dumbbell
Type: Upper, Push
Target: Chest
Synergist: Shoulders, Triceps
Bench Press, Smith Machine
Type: Upper, Push
Target: Chest
Synergist: Shoulders, Triceps
Bench Press, Band
Type: Upper, Push
Target: Chest
Synergist: Shoulders, Triceps
Bench Press, Kettlebell
Type: Upper, Push
Target: Chest
Synergist: Shoulders, Triceps

Bench Press Close Grip, Barbell
Type: Upper, Push
Target: Triceps
Synergist: Shoulders, Chest
Bench Press Close Grip, Smith Machine
Type: Upper, Push
Target: Triceps
Synergist: Shoulders, Chest
Bench Press Close Grip, EZ Bar
Type: Upper, Push
Target: Triceps
Synergist: Shoulders, Chest
Bench Press Wide Grip, Barbell
Type: Upper, Push
Target: Chest
Synergist: Shoulders, Triceps
Bench Press Wide Grip, Smith Machine
Type: Upper, Push
Target: Chest
Synergist: Shoulders, Triceps
Bent Over One Arm Row, Dumbbell
Type: Upper, Pull
Target: Back
Synergist: Shoulders, Biceps, Forearms, Chest
Bent Over Row, Barbell
Type: Upper, Pull
Target: Back
Synergist: Shoulders, Biceps, Forearms
Bent Over Row, Cable
Type: Upper, Pull
Target: Back
Synergist: Shoulders, Biceps, Forearms
Bent Over Row, Dumbbell
Type: Upper, Pull
Target: Back
Synergist: Shoulders, Biceps, Forearms
Bent Over Row, Smith Machine
Type: Upper, Pull
Target: Back
Synergist: Shoulders, Biceps, Forearms
Bent Over Row, Band
Type: Upper, Pull
Target: Back
Synergist: Shoulders, Biceps, Forearms
Bent Over Row, Leverage Machine
Type: Upper, Pull
Target: Back
Synergist: Shoulders, Biceps, Forearms
Bicep Curl, Barbell
Type: Upper, Pull
Target: Biceps
Synergist: Forearms
Bicep Curl, Cable
Type: Upper, Pull
Target: Biceps
Synergist: Forearms
Bicep Curl, Dumbbell
Type: Upper, Pull
Target: Biceps
Synergist: Forearms
Bicep Curl, Band
Type: Upper, Pull
Target: Biceps
Synergist: Forearms
Bicep Curl, Leverage Machine
Type: Upper, Pull
Target: Biceps
Synergist: Forearms
Bicep Curl, EZ Bar
Type: Upper, Pull
Target: Biceps
Synergist: Forearms
Bicycle Crunch, Bodyweight
Type: Core
Target: Abs
Synergist: Glutes, Quadriceps
Box Squat, Barbell
Type: Lower, Legs
Target: Glutes, Quadriceps
Synergist: Hamstrings, Calves
Box Squat, Dumbbell
Type: Lower, Legs
Target: Glutes, Quadriceps
Synergist: Hamstrings, Calves
Bulgarian Split Squat, Dumbbell
Type: Lower, Legs
Target: Glutes, Quadriceps
Synergist: Hamstrings, Calves
Cable Crossover, Cable
Type: Upper, Pull
Target: Chest
Synergist: Shoulders
Cable Crunch, Cable
Type: Core
Target: Abs
Cable Kickback, Cable
Type: Upper, Push
Target: Triceps
Cable Pull Through, Cable
Type: Lower, Pull
Target: Glutes
Synergist: Back, Hamstrings
Cable Twist, Barbell
Type: Core
Target: Abs
Synergist: Glutes
Cable Twist, Cable
Type: Core
Target: Abs
Synergist: Glutes
Cable Twist, Band
Type: Core
Target: Abs
Synergist: Glutes
Cable Twist, Bodyweight
Type: Core
Target: Abs
Synergist: Glutes
Cable Twist, Leverage Machine
Type: Core
Target: Abs
Synergist: Glutes
Calf Press on Leg Press, Leverage Machine
Type: Lower, Legs
Target: Calves
Calf Press on Seated Leg Press, Leverage Machine
Type: Lower, Legs
Target: Calves, Quadriceps
Synergist: Glutes, Hamstrings
Chest Dip, Bodyweight
Type: Upper, Push
Target: Chest
Synergist: Shoulders, Back, Triceps
Chest Fly, Barbell
Type: Upper, Push
Target: Chest
Synergist: Biceps, Shoulders
Chest Fly, Cable
Type: Upper, Push
Target: Chest
Synergist: Biceps, Shoulders
Chest Fly, Dumbbell
Type: Upper, Push
Target: Chest
Synergist: Biceps, Shoulders
Chest Fly, Leverage Machine
Type: Upper, Push
Target: Chest
Synergist: Biceps, Shoulders
Chest Press, Band
Type: Upper, Push
Target: Chest
Synergist: Biceps, Shoulders
Chest Press, Leverage Machine
Type: Upper, Push
Target: Chest
Synergist: Biceps, Shoulders
Chin Up, Bodyweight
Type: Upper, Pull
Target: Back
Synergist: Biceps, Forearms, Shoulders, Chest
Chin Up, Leverage Machine
Type: Upper, Pull
Target: Back
Synergist: Biceps, Forearms, Shoulders, Chest
Clean, Barbell
Type: Upper, Lower, Push
Target: Glutes, Hamstrings, Quadriceps, Back, Shoulders
Synergist: Calves, Biceps, Chest, Forearms
Clean and Jerk, Barbell
Type: Upper, Lower, Push
Target: Glutes, Hamstrings, Quadriceps, Back, Shoulders
Synergist: Calves, Biceps, Chest, Forearms
Concentration Curl, Barbell
Type: Upper, Pull
Target: Biceps
Synergist: Forearms
Concentration Curl, Cable
Type: Upper, Pull
Target: Biceps
Synergist: Forearms
Concentration Curl, Dumbbell
Type: Upper, Pull
Target: Biceps
Synergist: Forearms
Concentration Curl, Band
Type: Upper, Pull
Target: Biceps
Synergist: Forearms
Cross Body Crunch, Bodyweight
Type: Core
Target: Abs
Synergist: Glutes, Quadriceps
Crunch, Cable
Type: Core
Target: Abs
Crunch, Bodyweight
Type: Core
Target: Abs
Crunch, Leverage Machine
Type: Core
Target: Abs
Deadlift, Barbell
Type: Lower, Pull
Target: Glutes, Back, Hamstrings
Synergist: Quadriceps, Calves, Abs, Forearms
Deadlift, Cable
Type: Lower, Pull
Target: Glutes, Back, Hamstrings
Synergist: Quadriceps, Calves, Abs, Forearms
Deadlift, Dumbbell
Type: Lower, Pull
Target: Glutes, Back, Hamstrings
Synergist: Quadriceps, Calves, Abs, Forearms
Deadlift, Smith Machine
Type: Lower, Pull
Target: Glutes, Back, Hamstrings
Synergist: Quadriceps, Calves, Abs, Forearms
Deadlift, Band
Type: Lower, Pull
Target: Glutes, Back, Hamstrings
Synergist: Quadriceps, Calves, Abs, Forearms
Deadlift, Kettlebell
Type: Lower, Pull
Target: Glutes, Back, Hamstrings
Synergist: Quadriceps, Calves, Abs, Forearms
Deadlift, Leverage Machine
Type: Lower, Pull
Target: Glutes, Back, Hamstrings
Synergist: Quadriceps, Calves, Abs, Forearms
Deadlift High Pull, Barbell
Type: Upper, Lower, Pull
Target: Shoulders, Glutes, Quadriceps
Synergist: Hamstrings, Biceps, Forearms, Calves, Back
Decline Bench Press, Dumbbell
Type: Upper, Push
Target: Chest
Synergist: Shoulders, Triceps
Decline Bench Press, Smith Machine
Type: Upper, Push
Target: Chest
Synergist: Shoulders, Triceps
Deficit Deadlift, Barbell
Type: Lower, Pull
Target: Glutes
Synergist: Hamstrings, Back, Quadriceps, Calves
Deficit Deadlift, Trap Bar
Type: Lower, Pull
Target: Glutes
Synergist: Hamstrings, Back, Quadriceps, Calves
Elliptical Machine, Leverage Machine
Type: Lower, Legs
Synergist: Biceps, Forearms, Shoulders, Glutes, Hamstrings, Back, Chest, Quadriceps
Face Pull, Band
Type: Upper, Pull
Target: Shoulders
Synergist: Biceps, Forearms, Back
Flat Knee Raise, Bodyweight
Type: Core
Target: Abs
Synergist: Hamstrings, Quadriceps
Flat Leg Raise, Bodyweight
Type: Core
Target: Abs
Synergist: Hamstrings, Quadriceps, Glutes
Front Raise, Barbell
Type: Upper, Push
Target: Shoulders
Synergist: Chest
Front Raise, Cable
Type: Upper, Push
Target: Shoulders
Synergist: Chest
Front Raise, Dumbbell
Type: Upper, Push
Target: Shoulders
Synergist: Chest
Front Raise, Band
Type: Upper, Push
Target: Shoulders
Synergist: Chest
Front Raise, Bodyweight
Type: Upper, Push
Target: Shoulders
Synergist: Chest
Front Squat, Barbell
Type: Lower, Legs
Target: Glutes, Quadriceps
Synergist: Hamstrings, Calves
Front Squat, Cable
Type: Lower, Legs
Target: Glutes, Quadriceps
Synergist: Hamstrings, Calves
Front Squat, Dumbbell
Type: Lower, Legs
Target: Glutes, Quadriceps
Synergist: Hamstrings, Calves
Front Squat, Smith Machine
Type: Lower, Legs
Target: Glutes, Quadriceps
Synergist: Hamstrings, Calves
Front Squat, Kettlebell
Type: Lower, Legs
Target: Glutes, Quadriceps
Synergist: Hamstrings, Calves
Glute Bridge, Barbell
Type: Lower, Legs
Target: Glutes
Synergist: Hamstrings, Quadriceps
Glute Bridge, Dumbbell
Type: Lower, Legs
Target: Glutes
Synergist: Hamstrings, Quadriceps
Glute Bridge, Band
Type: Lower, Legs
Target: Glutes
Synergist: Hamstrings, Quadriceps
Glute Bridge March, Bodyweight
Type: Lower, Legs
Target: Glutes, Abs
Synergist: Hamstrings, Quadriceps
Glute Kickback, Cable
Type: Lower, Legs
Target: Glutes
Synergist: Hamstrings, Abs
Glute Kickback, Band
Type: Lower, Legs
Target: Glutes
Synergist: Hamstrings, Abs
Goblet Squat, Dumbbell
Type: Lower, Legs
Target: Glutes, Quadriceps
Synergist: Hamstrings, Calves
Goblet Squat, Kettlebell
Type: Lower, Legs
Target: Glutes, Quadriceps
Synergist: Hamstrings, Calves
Good Morning, Barbell
Type: Lower, Legs
Target: Hamstrings
Synergist: Glutes
Good Morning, Smith Machine
Type: Lower, Legs
Target: Hamstrings
Synergist: Glutes
Good Morning, Leverage Machine
Type: Lower, Legs
Target: Hamstrings
Synergist: Glutes
Hack Squat, Barbell
Type: Lower, Legs
Target: Glutes, Quadriceps
Synergist: Hamstrings, Calves
Hack Squat, Smith Machine
Type: Lower, Legs
Target: Glutes, Quadriceps
Synergist: Hamstrings, Calves
Hammer Curl, Cable
Type: Upper, Pull
Target: Forearms, Biceps
Synergist: Shoulders
Hammer Curl, Dumbbell
Type: Upper, Pull
Target: Forearms, Biceps
Synergist: Shoulders
Hammer Curl, Band
Type: Upper, Pull
Target: Forearms, Biceps
Synergist: Shoulders
Handstand Push Up, Bodyweight
Type: Upper, Push
Target: Triceps
Synergist: Shoulders, Chest
Hang Clean, Kettlebell
Type: Upper, Lower, Pull
Target: Biceps, Forearms
Synergist: Shoulders, Chest
Hanging Leg Raise, Cable
Type: Core
Target: Abs
Synergist: Quadriceps, Glutes
Hanging Leg Raise, Bodyweight
Type: Core
Target: Abs
Synergist: Quadriceps, Glutes
High Row, Cable
Type: Upper, Pull
Target: Back
Synergist: Biceps, Forearms, Shoulders
High Row, Leverage Machine
Type: Upper, Pull
Target: Back
Synergist: Biceps, Forearms, Shoulders
Hip Abductor, Cable
Type: Lower, Legs
Target: Glutes
Hip Abductor, Band
Type: Lower, Legs
Target: Glutes
Hip Abductor, Bodyweight
Type: Lower, Legs
Target: Glutes
Hip Abductor, Leverage Machine
Type: Lower, Legs
Target: Glutes
Hip Adductor, Leverage Machine
Type: Lower, Legs
Target: Hamstrings, Glutes
Synergist: Quadriceps
Hip Thrust, Barbell
Type: Lower, Legs
Target: Glutes
Synergist: Hamstrings, Quadriceps
Hip Thrust, Band
Type: Lower, Legs
Target: Glutes
Synergist: Hamstrings, Quadriceps
Hip Thrust, Bodyweight
Type: Lower, Legs
Target: Glutes
Synergist: Hamstrings, Quadriceps
Hip Thrust, Leverage Machine
Type: Lower, Legs
Target: Glutes
Synergist: Hamstrings, Quadriceps
Incline Bench Press, Barbell
Type: Upper, Push
Target: Chest
Synergist: Shoulders, Triceps
Incline Bench Press, Cable
Type: Upper, Push
Target: Chest
Synergist: Shoulders, Triceps
Incline Bench Press, Dumbbell
Type: Upper, Push
Target: Chest
Synergist: Shoulders, Triceps
Incline Bench Press, Smith Machine
Type: Upper, Push
Target: Chest
Synergist: Shoulders, Triceps
Incline Bench Press Wide Grip, Barbell
Type: Upper, Push
Target: Chest
Synergist: Shoulders, Triceps
Incline Chest Fly, Cable
Type: Upper, Push
Target: Chest
Synergist: Biceps, Shoulders
Incline Chest Fly, Dumbbell
Type: Upper, Push
Target: Chest
Synergist: Biceps, Shoulders
Incline Chest Press, Dumbbell
Type: Upper, Push
Target: Chest
Synergist: Shoulders, Triceps
Incline Chest Press, Band
Type: Upper, Push
Target: Chest
Synergist: Shoulders, Triceps
Incline Chest Press, Leverage Machine
Type: Upper, Push
Target: Chest
Synergist: Shoulders, Triceps
Incline Curl, Dumbbell
Type: Upper, Pull
Target: Biceps
Synergist: Forearms
Incline Row, Barbell
Type: Upper, Pull
Target: Back
Synergist: Shoulders, Biceps, Forearms, Chest
Incline Row, Dumbbell
Type: Upper, Pull
Target: Back
Synergist: Shoulders, Biceps, Forearms, Chest
Inverted Row, Bodyweight
Type: Upper, Pull
Target: Back
Synergist: Shoulders, Biceps, Forearms, Chest
Jackknife Sit Up, Bodyweight
Type: Core
Target: Abs
Synergist: Hamstrings, Quadriceps, Glutes
Jump Squat, Barbell
Type: Lower, Legs
Target: Glutes, Quadriceps
Synergist: Hamstrings, Calves
Jump Squat, Bodyweight
Type: Lower, Legs
Target: Glutes, Quadriceps
Synergist: Hamstrings, Calves
Kettlebell Swing, Dumbbell
Type: Upper, Lower, Core
Target: Shoulders, Glutes
Synergist: Hamstrings, Chest, Calves
Kettlebell Swing, Kettlebell
Type: Upper, Lower, Core
Target: Shoulders, Glutes
Synergist: Hamstrings, Chest, Calves
Kneeling Pulldown, Band
Type: Upper, Pull
Target: Back
Synergist: Biceps, Forearms, Shoulders
Knees to Elbows, Bodyweight
Type: Core
Target: Abs
Synergist: Quadriceps
Lat Pulldown, Cable
Type: Upper, Pull
Target: Back
Synergist: Biceps, Forearms, Shoulders, Abs, Chest
Lat Pulldown, Leverage Machine
Type: Upper, Pull
Target: Back
Synergist: Biceps, Forearms, Shoulders, Abs, Chest
Lateral Raise, Cable
Type: Upper, Push
Target: Shoulders
Synergist: Chest
Lateral Raise, Dumbbell
Type: Upper, Push
Target: Shoulders
Synergist: Chest
Lateral Raise, Band
Type: Upper, Push
Target: Shoulders
Synergist: Chest
Lateral Raise, Kettlebell
Type: Upper, Push
Target: Shoulders
Synergist: Chest
Lateral Raise, Leverage Machine
Type: Upper, Push
Target: Shoulders
Synergist: Chest
Leg Extension, Band
Type: Lower, Legs
Target: Quadriceps
Synergist: Glutes
Leg Extension, Leverage Machine
Type: Lower, Legs
Target: Quadriceps
Synergist: Glutes
Leg Press, Smith Machine
Type: Lower, Legs
Target: Glutes, Quadriceps
Synergist: Hamstrings, Calves
Leg Press, Leverage Machine
Type: Lower, Legs
Target: Glutes, Quadriceps
Synergist: Hamstrings, Calves
Legs Up Bench Press, Barbell
Type: Upper, Push
Target: Chest
Synergist: Shoulders, Triceps
Lunge, Barbell
Type: Lower, Legs
Target: Glutes, Quadriceps
Synergist: Hamstrings, Calves
Lunge, Cable
Type: Lower, Legs
Target: Glutes, Quadriceps
Synergist: Hamstrings, Calves
Lunge, Dumbbell
Type: Lower, Legs
Target: Glutes, Quadriceps
Synergist: Hamstrings, Calves
Lunge, Bodyweight
Type: Lower, Legs
Target: Glutes, Quadriceps
Synergist: Hamstrings, Calves
Lying Bicep Curl, Cable
Type: Upper, Pull
Target: Biceps
Synergist: Forearms
Lying Bicep Curl, Dumbbell
Type: Upper, Pull
Target: Biceps
Synergist: Forearms
Lying Leg Curl, Band
Type: Lower, Legs
Target: Hamstrings
Synergist: Calves
Lying Leg Curl, Leverage Machine
Type: Lower, Legs
Target: Hamstrings
Synergist: Calves
Muscle Up, Bodyweight
Type: Upper, Pull
Target: Biceps, Forearms, Shoulders, Back, Chest, Triceps
Oblique Crunch, Bodyweight
Type: Core
Target: Abs
Overhead Press, Barbell
Type: Upper, Push
Target: Shoulders
Synergist: Chest, Triceps
Overhead Press, Dumbbell
Type: Upper, Push
Target: Shoulders
Synergist: Chest, Triceps
Overhead Press, EZ Bar
Type: Upper, Push
Target: Shoulders
Synergist: Chest, Triceps
Overhead Squat, Barbell
Type: Lower, Legs
Target: Quadriceps
Synergist: Hamstrings, Glutes, Calves
Overhead Squat, Dumbbell
Type: Lower, Legs
Target: Quadriceps
Synergist: Hamstrings, Glutes, Calves
Pec Deck, Leverage Machine
Type: Upper, Push
Target: Chest
Pendlay Row, Barbell
Type: Upper, Pull
Target: Back
Synergist: Shoulders, Biceps, Forearms
Pistol Squat, Kettlebell
Type: Lower, Legs
Target: Glutes, Quadriceps
Synergist: Hamstrings, Calves
Pistol Squat, Bodyweight
Type: Lower, Legs
Target: Glutes, Quadriceps
Synergist: Hamstrings, Calves
Pistol Squat, Leverage Machine
Type: Lower, Legs
Target: Glutes, Quadriceps
Synergist: Hamstrings, Calves
Plank, Bodyweight
Type: Core
Target: Abs
Synergist: Shoulders, Glutes, Quadriceps
Preacher Curl, Barbell
Type: Upper, Pull
Target: Biceps
Synergist: Forearms
Preacher Curl, Dumbbell
Type: Upper, Pull
Target: Biceps
Synergist: Forearms
Preacher Curl, Leverage Machine
Type: Upper, Pull
Target: Biceps
Synergist: Forearms
Preacher Curl, EZ Bar
Type: Upper, Pull
Target: Biceps
Synergist: Forearms
Pull Up, Band
Type: Upper, Pull
Target: Back
Synergist: Biceps, Forearms, Shoulders
Pull Up, Bodyweight
Type: Upper, Pull
Target: Back
Synergist: Biceps, Forearms, Shoulders
Pull Up, Leverage Machine
Type: Upper, Pull
Target: Back
Synergist: Biceps, Forearms, Shoulders
Pullover, Barbell
Type: Upper, Pull
Target: Back
Synergist: Chest, Shoulders, Triceps
Pullover, Dumbbell
Type: Upper, Pull
Target: Back
Synergist: Chest, Shoulders, Triceps
Push Press, Barbell
Type: Upper, Push
Target: Shoulders
Synergist: Biceps, Chest
Push Press, Dumbbell
Type: Upper, Push
Target: Shoulders
Synergist: Biceps, Chest
Push Press, Kettlebell
Type: Upper, Push
Target: Shoulders
Synergist: Biceps, Chest
Push Press, Bodyweight
Type: Upper, Push
Target: Shoulders
Synergist: Biceps, Chest
Push Up, Band
Type: Upper, Push
Target: Chest
Synergist: Shoulders, Triceps
Push Up, Bodyweight
Type: Upper, Push
Target: Chest
Synergist: Shoulders, Triceps
Reverse Crunch, Cable
Type: Core
Target: Abs
Reverse Crunch, Bodyweight
Type: Core
Target: Abs
Reverse Curl, Barbell
Type: Upper, Pull
Target: Forearms
Synergist: Biceps
Reverse Curl, Cable
Type: Upper, Pull
Target: Forearms
Synergist: Biceps
Reverse Curl, Dumbbell
Type: Upper, Pull
Target: Forearms
Synergist: Biceps
Reverse Curl, Band
Type: Upper, Pull
Target: Forearms
Synergist: Biceps
Reverse Fly, Dumbbell
Type: Upper, Pull
Target: Shoulders
Synergist: Back
Reverse Fly, Band
Type: Upper, Pull
Target: Shoulders
Synergist: Back
Reverse Fly, Leverage Machine
Type: Upper, Pull
Target: Shoulders
Synergist: Back
Reverse Hyperextension, Band
Type: Core, Lower
Target: Glutes
Synergist: Hamstrings
Reverse Hyperextension, Leverage Machine
Type: Core, Lower
Target: Glutes
Synergist: Hamstrings
Reverse Lunge, Barbell
Type: Lower, Legs
Target: Quadriceps
Synergist: Hamstrings, Calves, Glutes
Reverse Lunge, Dumbbell
Type: Lower, Legs
Target: Quadriceps
Synergist: Hamstrings, Calves, Glutes
Reverse Lunge, Kettlebell
Type: Lower, Legs
Target: Quadriceps
Synergist: Hamstrings, Calves, Glutes
Reverse Lunge, Bodyweight
Type: Lower, Legs
Target: Quadriceps
Synergist: Hamstrings, Calves, Glutes
Reverse Wrist Curl, Barbell
Type: Upper, Pull
Target: Forearms
Reverse Wrist Curl, Dumbbell
Type: Upper, Pull
Target: Forearms
Reverse Wrist Curl, EZ Bar
Type: Upper, Pull
Target: Forearms
Romanian Deadlift, Barbell
Type: Lower, Legs
Target: Back, Glutes, Hamstrings
Synergist: Abs, Calves
Romanian Deadlift, Dumbbell
Type: Lower, Legs
Target: Back, Glutes, Hamstrings
Synergist: Abs, Calves
Russian Twist, Cable
Type: Core
Target: Abs
Russian Twist, Dumbbell
Type: Core
Target: Abs
Russian Twist, Bodyweight
Type: Core
Target: Abs
Safety Squat Bar Squat, Barbell
Type: Lower, Legs
Target: Glutes, Quadriceps
Synergist: Hamstrings, Back, Calves
Seated Calf Raise, Barbell
Type: Lower, Legs
Target: Calves
Seated Calf Raise, Dumbbell
Type: Lower, Legs
Target: Calves
Seated Calf Raise, Leverage Machine
Type: Lower, Legs
Target: Calves
Seated Front Raise, Barbell
Type: Upper, Push
Target: Shoulders
Synergist: Chest
Seated Front Raise, Dumbbell
Type: Upper, Push
Target: Shoulders
Synergist: Chest
Seated Leg Curl, Leverage Machine
Type: Lower, Legs
Target: Hamstrings
Synergist: Calves, Quadriceps
Seated Leg Press, Leverage Machine
Type: Lower, Legs
Target: Glutes, Quadriceps
Synergist: Hamstrings, Calves
Seated Overhead Press, Barbell
Type: Upper, Push
Target: Shoulders
Synergist: Chest, Triceps
Seated Palms Up Wrist Curl, Dumbbell
Type: Upper, Pull
Target: Forearms
Seated Row, Cable
Type: Upper, Pull
Target: Back
Synergist: Shoulders, Biceps, Forearms, Chest
Seated Row, Band
Type: Upper, Pull
Target: Back
Synergist: Shoulders, Biceps, Forearms, Chest
Seated Row, Leverage Machine
Type: Upper, Pull
Target: Back
Synergist: Shoulders, Biceps, Forearms, Chest
Seated Wide Grip Row, Cable
Type: Upper, Pull
Target: Back
Synergist: Shoulders, Biceps, Forearms
Shoulder Press, Cable
Type: Upper, Push
Target: Shoulders
Synergist: Chest, Triceps
Shoulder Press, Dumbbell
Type: Upper, Push
Target: Shoulders
Synergist: Chest, Triceps
Shoulder Press, Smith Machine
Type: Upper, Push
Target: Shoulders
Synergist: Chest, Triceps
Shoulder Press, Band
Type: Upper, Push
Target: Shoulders
Synergist: Chest, Triceps
Shoulder Press, Leverage Machine
Type: Upper, Push
Target: Shoulders
Synergist: Chest, Triceps
Shoulder Press Parallel Grip, Dumbbell
Type: Upper, Push
Target: Shoulders
Synergist: Chest, Triceps
Shrug, Barbell
Type: Upper, Pull
Target: Back
Shrug, Cable
Type: Upper, Pull
Target: Back
Shrug, Dumbbell
Type: Upper, Pull
Target: Back
Shrug, Smith Machine
Type: Upper, Pull
Target: Back
Shrug, Band
Type: Upper, Pull
Target: Back
Shrug, Leverage Machine
Type: Upper, Pull
Target: Back
Side Bend, Cable
Type: Core
Target: Abs
Side Bend, Dumbbell
Type: Core
Target: Abs
Side Bend, Band
Type: Core
Target: Abs
Side Crunch, Cable
Type: Core
Target: Abs
Side Crunch, Band
Type: Core
Target: Abs
Side Crunch, Bodyweight
Type: Core
Target: Abs
Side Hip Abductor, Barbell
Type: Lower, Legs
Target: Glutes
Side Hip Abductor, Bodyweight
Type: Lower, Legs
Target: Glutes
Side Hip Abductor, Leverage Machine
Type: Lower, Legs
Target: Glutes
Side Lying Clam, Bodyweight
Type: Lower, Legs
Target: Glutes
Side Plank, Bodyweight
Type: Core
Target: Abs
Single Leg Bridge, Bodyweight
Type: Lower, Legs
Target: Glutes, Abs
Synergist: Shoulders, Hamstrings, Chest
Single Leg Deadlift, Dumbbell
Type: Lower, Legs
Target: Back, Glutes
Synergist: Hamstrings
Single Leg Deadlift, Bodyweight
Type: Lower, Legs
Target: Back, Glutes
Synergist: Hamstrings
Single Leg Glute Bridge Bent Knee, Bodyweight
Type: Lower, Legs
Target: Glutes
Single Leg Glute Bridge On Bench, Bodyweight
Type: Lower, Legs
Target: Glutes
Single Leg Glute Bridge Straight Leg, Bodyweight
Type: Lower, Legs
Target: Glutes
Single Leg Hip Thrust, Barbell
Type: Lower, Legs
Target: Glutes
Synergist: Hamstrings, Quadriceps
Single Leg Hip Thrust, Bodyweight
Type: Lower, Legs
Target: Glutes
Synergist: Hamstrings, Quadriceps
Single Leg Hip Thrust, Leverage Machine
Type: Lower, Legs
Target: Glutes
Synergist: Hamstrings, Quadriceps
Sissy Squat, Bodyweight
Type: Lower, Legs
Target: Quadriceps
Synergist: Hamstrings
Sit Up, Kettlebell
Type: Core
Target: Abs
Sit Up, Bodyweight
Type: Core
Target: Abs
Skullcrusher, Barbell
Type: Upper, Push
Target: Triceps
Skullcrusher, Cable
Type: Upper, Push
Target: Triceps
Skullcrusher, Dumbbell
Type: Upper, Push
Target: Triceps
Skullcrusher, EZ Bar
Type: Upper, Push
Target: Triceps
Snatch, Dumbbell
Type: Upper, Lower, Pull
Target: Shoulders, Back, Glutes, Quadriceps
Synergist: Hamstrings, Calves, Chest, Triceps
Split Squat, Barbell
Type: Lower, Legs
Target: Glutes, Quadriceps
Synergist: Hamstrings, Calves
Split Squat, Dumbbell
Type: Lower, Legs
Target: Glutes, Quadriceps
Synergist: Hamstrings, Calves
Split Squat, Band
Type: Lower, Legs
Target: Glutes, Quadriceps
Synergist: Hamstrings, Calves
Split Squat, Kettlebell
Type: Lower, Legs
Target: Glutes, Quadriceps
Synergist: Hamstrings, Calves
Split Squat, Bodyweight
Type: Lower, Legs
Target: Glutes, Quadriceps
Synergist: Hamstrings, Calves
Squat, Barbell
Type: Lower, Legs
Target: Glutes, Quadriceps
Synergist: Hamstrings, Calves, Back, Abs
Squat, Dumbbell
Type: Lower, Legs
Target: Glutes, Quadriceps
Synergist: Hamstrings, Calves, Back, Abs
Squat, Smith Machine
Type: Lower, Legs
Target: Glutes, Quadriceps
Synergist: Hamstrings, Calves, Back, Abs
Squat, Bodyweight
Type: Lower, Legs
Target: Glutes, Quadriceps
Synergist: Hamstrings, Calves, Back, Abs
Squat, Leverage Machine
Type: Lower, Legs
Target: Glutes, Quadriceps
Synergist: Hamstrings, Calves, Back, Abs
Squat Row, Band
Type: Upper, Lower, Pull
Target: Glutes, Back
Synergist: Shoulders, Hamstrings, Chest, Quadriceps, Calves
Standing Calf Raise, Barbell
Type: Lower, Legs
Target: Calves
Standing Calf Raise, Cable
Type: Lower, Legs
Target: Calves
Standing Calf Raise, Dumbbell
Type: Lower, Legs
Target: Calves
Standing Calf Raise, Bodyweight
Type: Lower, Legs
Target: Calves
Standing Calf Raise, Leverage Machine
Type: Lower, Legs
Target: Calves
Standing Row, Cable
Type: Upper, Pull
Target: Back
Synergist: Shoulders, Biceps, Forearms
Standing Row Close Grip, Cable
Type: Upper, Pull
Target: Back
Synergist: Shoulders, Biceps, Forearms
Standing Row Rear Delt With Rope, Cable
Type: Upper, Pull
Target: Shoulders
Synergist: Biceps, Forearms, Back
Standing Row Rear Delt, Horizontal, With Rope, Cable
Type: Upper, Pull
Target: Shoulders
Synergist: Back
Standing Row V-Bar, Cable
Type: Upper, Pull
Target: Back
Synergist: Shoulders, Biceps, Forearms, Chest
Step up, Barbell
Type: Lower, Legs
Target: Glutes, Quadriceps
Synergist: Hamstrings, Calves
Step up, Dumbbell
Type: Lower, Legs
Target: Glutes, Quadriceps
Synergist: Hamstrings, Calves
Step up, Band
Type: Lower, Legs
Target: Glutes, Quadriceps
Synergist: Hamstrings, Calves
Step up, Bodyweight
Type: Lower, Legs
Target: Glutes, Quadriceps
Synergist: Hamstrings, Calves
Stiff Leg Deadlift, Barbell
Type: Lower, Legs
Target: Back, Glutes, Hamstrings
Synergist: Quadriceps, Abs
Stiff Leg Deadlift, Dumbbell
Type: Lower, Legs
Target: Back, Glutes, Hamstrings
Synergist: Quadriceps, Abs
Stiff Leg Deadlift, Band
Type: Lower, Legs
Target: Back, Glutes, Hamstrings
Synergist: Quadriceps, Abs
Straight Leg Deadlift, Barbell
Type: Lower, Legs
Target: Back, Hamstrings
Synergist: Glutes
Straight Leg Deadlift, Dumbbell
Type: Lower, Legs
Target: Back, Hamstrings
Synergist: Glutes
Straight Leg Deadlift, Band
Type: Lower, Legs
Target: Back, Hamstrings
Synergist: Glutes
Straight Leg Deadlift, Kettlebell
Type: Lower, Legs
Target: Back, Hamstrings
Synergist: Glutes
Sumo Deadlift, Barbell
Type: Lower, Legs
Target: Glutes, Quadriceps, Hamstrings, Back
Synergist: Abs, Biceps, Forearms
Sumo Deadlift High Pull, Barbell
Type: Upper, Lower, Pull
Target: Shoulders, Glutes, Quadriceps
Synergist: Hamstrings, Biceps, Forearms, Calves, Back
Superman, Dumbbell
Type: Core
Target: Back
Synergist: Glutes, Hamstrings
Superman, Bodyweight
Type: Core
Target: Back
Synergist: Glutes, Hamstrings
T Bar Row, Leverage Machine
Type: Upper, Pull
Target: Back
Synergist: Shoulders, Biceps, Forearms, Chest
Thruster, Barbell
Type: Upper, Lower, Push
Target: Shoulders, Glutes, Quadriceps
Synergist: Hamstrings, Chest, Calves, Triceps
Toes To Bar, Bodyweight
Type: Core
Target: Abs
Synergist: Quadriceps, Glutes
Trap Bar Deadlift, Trap Bar
Type: Lower, Legs
Target: Glutes, Quadriceps
Synergist: Hamstrings, Calves
Triceps Dip, Bodyweight
Type: Upper, Push
Target: Triceps
Synergist: Back, Chest, Shoulders
Triceps Dip, Leverage Machine
Type: Upper, Push
Target: Triceps
Synergist: Back, Chest, Shoulders
Triceps Extension, Barbell
Type: Upper, Push
Target: Triceps
Triceps Extension, Cable
Type: Upper, Push
Target: Triceps
Triceps Extension, Dumbbell
Type: Upper, Push
Target: Triceps
Triceps Extension, Band
Type: Upper, Push
Target: Triceps
Triceps Pushdown, Cable
Type: Upper, Push
Target: Triceps
Upright Row, Barbell
Type: Upper, Pull
Target: Shoulders
Synergist: Biceps, Forearms, Chest, Back
Upright Row, Cable
Type: Upper, Pull
Target: Shoulders
Synergist: Biceps, Forearms, Chest, Back
Upright Row, Dumbbell
Type: Upper, Pull
Target: Shoulders
Synergist: Biceps, Forearms, Chest, Back
Upright Row, Band
Type: Upper, Pull
Target: Shoulders
Synergist: Biceps, Forearms, Chest, Back
V Up, Dumbbell
Type: Core
Target: Abs
Synergist: Quadriceps
V Up, Band
Type: Core
Target: Abs
Synergist: Quadriceps
V Up, Bodyweight
Type: Core
Target: Abs
Synergist: Quadriceps
Wide Pull Up, Bodyweight
Type: Upper, Pull
Target: Back
Synergist: Biceps, Forearms, Shoulders
Wrist Curl, Barbell
Type: Upper, Pull
Target: Forearms
Wrist Curl, Dumbbell
Type: Upper, Pull
Target: Forearms
Wrist Curl, EZ Bar
Type: Upper, Pull
Target: Forearms
Wrist Roller, Bodyweight
Type: Upper, Pull
Target: Forearms
Zercher Squat, Barbell
Type: Lower, Legs
Target: Glutes, Quadriceps
Synergist: Hamstrings, Calves